Hardware
Schematic
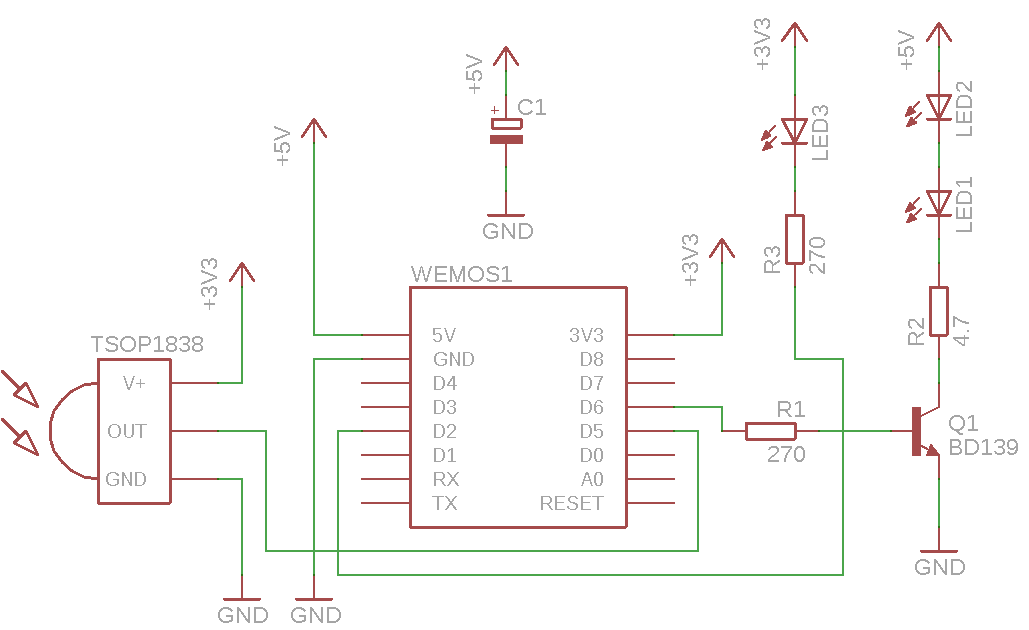
The device is built around a Wemos D1 mini, as this provides a ESP8266 microcontroller with WiFi capabilities, a convenient serial interface for loading the firmware, as well as a power converter to turn the 5V from an micro USB power supply into the 3.3V the ESP8266 needs. A 1A Micro-USB power supply is sufficient.
Board layout
 Refer to the board layout shown on the right for building the device.
For the best results, powerful IR LEDs (LED1 and LED2) should be used. For example SFH4503. Be careful about which lead is anode and which is cathode. On a real SFH4503 these are marked opposite from what is usual for LEDs, but I've been told that IR LEDs from aliexpress, advertised as SFH4503, use the normal markings. The best way to be sure is to use a multimeter in diode test mode. The 4.7Ω resistor results in a current of about 0.5A through the IR LEDs. Adjust the resistor value appropriately when using IR LEDs that are rated for lower pulse currents.
The regular LED (LED3) needs to be red (645-700nm). Other colors will not be visible through the IR front panel. The capacitor (C1) should be around 1000µF, 6V. Depending on the physical size of the part, it may have to be installed horizontally to fit inside the enclosure.
The Wemos D1 mini normally comes with male and female headers. However, it will not fit in the enclosure when using both of those. I advise to solder the male headers to the circuit board. Then place the circuit board in the bottom part of the enclosure and use the hole for the micro USB plug in the back panel to determine at which height the board must be soldered onto the male headers.
Download the Eagle design files
Enclosure
The circuit board was designed for a Strapubox type 2412 enclosure. The front panel must be replaced by a piece of infrared acrylic plastic. A hole needs to be cut in the back panel for the micro USB connector. A small piece of infrared acrylic plastic is usually quite hard to obtain. The easiest way to get a complete set of components needed to build an ESPIRP, is to buy the ESPIRP kit at the Nodo shop. The Wemos D1 Mini is sold separately.Back panel
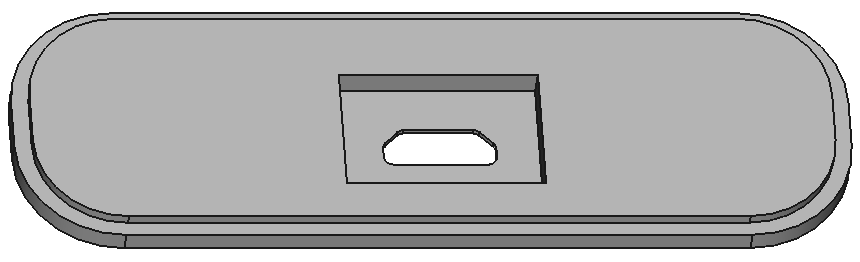 The front and back panels in the kit sold by the Nodo shop are cut using a
laser. Because USB plugs can vary considerably in size, the hole had to be
made quite big. A more aesthetically pleasing back panel can be produced
using a 3D printer.
The front and back panels in the kit sold by the Nodo shop are cut using a
laser. Because USB plugs can vary considerably in size, the hole had to be
made quite big. A more aesthetically pleasing back panel can be produced
using a 3D printer.
Download the 3D print design: Back panel.
Note: This design is intended for use with a Wemos D1 mini v1 and v2. On the
v3, the USB connector is rotated 180° and in a slightly different
position.
Suggested print settings:
| Filament: | PLA |
| Resolution: | 0.2 mm |
| Infill: | 20% |
| Support: | No |
| Rafts: | No |
| Ironing: | Yes |